How do you implement a custom UIView class that needs to draw over its contents? A quick tutorial that uses custom CoreGraphics, a customizable content view, and a neat trick to preserve the drawing hierarchy and your sanity.
Say you need a ‘bubble’ view wrapped around custom view. The bubble wants to resize around whatever content it has, but keeps a simple tail that points to some other UI element.
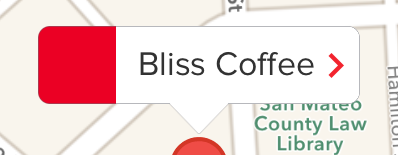
The tricky bit, of course, is here:
![]()
where the ‘tail’ connects to the content. You’ve got to draw it manually; you can’t fake it with an image, because the content view is going to change size and background color. Drawing only part of it and using an image for another part is unsatisfactory, because you’re never going to get the point sizes to match exactly with CoreGraphics’ drawing style.
So, a custom UIView subclass, override drawRect to draw the bubble outline, and allow a contentView to be assigned for the subviews, and you’re done. Easy-peasy. In and out like platform shoes.
Right?
But wait… your outlines are drawing under the custom view. This is because, of course, views render themselves before they render their subviews. If they didn’t, you’d never be able to set a background color. So your bubble is drawing perfectly, but then being drawn over by their contents. So, what to do?
These images from SparkInspector show the drawing order, and hint at the solution.
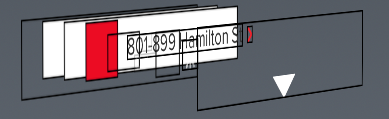
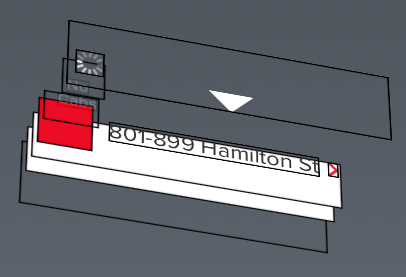
How to draw above your own subviews?
You essentially want drawRect to be called at the end of the draw cycle rather than at the beginning. The trick is to take advantage of the order of drawing.
First, build a UIView subclass that doesn’t do any drawing itself. Instead, it takes a reference to another instance to do its drawing. You could pass a block, or just provide the target and selector to call. You’ll put this ‘last’ in the drawing hierarchy - the deepest child.
In this class’ drawRect, forward the drawRect request to the specified selector. This will be implemented on the ‘hosting’ instance – in this case, the ‘BubbleView’. In this way, knowledge both about how to draw the bubble and how to size and organize its contents is encapsulated there.
Here’s the custom ‘overlay’ view class:
1 2 3 4 5 6 7 8 9 10 11 12 13 14 15 16 17 18 19 20 21 22 23 24 25 26 27 28 29 30 31 32 33 34 35 36 | |
1: Don’t hold strong references unnecessarily
The reference to the overlayedView is held weakly, to avoid a retention cycle.
2: Refer to the base view
Keep a reference to the base view and the selector it tells us to draw. Note we pass in a selector, rather than defining a protocol, because a given view may want to have several FWVOverlayViews drawing atop each other.
3: Use NSInvocation
You can’t used [self.overlayedView performSelector:...] because NSRects are structs, not objects. You could box it and unwrap it, but this keeps the adaptation logic in the overview class, where it belongs.
You could also pass in a block, instead, but there’s really no reason for a block to be hanging around for this.
4: Pass a reference to the NSRect as the third argument.
The arguments at index 0 and 1 are self and _cmd respectively. They’re implicit in ‘real’ message sends, and are set above bysetTarget and setSelector.
Then, use it like so:
1 2 3 4 5 6 7 8 9 10 | |
The drawOverlay: method has a signature identical to drawRect:, because it essentially is one, and is implemented as follows:
1 2 3 4 5 6 7 8 9 10 11 12 13 14 15 16 17 18 19 20 21 22 23 24 25 26 27 28 29 30 31 32 33 34 35 36 37 38 39 | |
Here’s how it breaks down:
1: Match the contentView’s background color
It’s not detailed here, but NWVBubbleView has a contentView, wrapped in a contentContainerView so it can control positioning. The ‘tail’ of the bubble should be drawn to match that view so it blends seamlessly.
2: Determine the shape of the ‘tail’
Here, the width and height of the tail are configurable properties of NWVBubbleView, and the tail is simply symmetric around the center.
3: Stroke
Draw the stroke first. Each call to CGContextBeginPath begins a new path, so you only need one per action. This also clears the path, so if you want to reuse a path, you can copy it and perform one action on each copy.
4: Fill
For the fill, we begin one borderWidth above the tail’s left point, then draw the same triangle, finishing similarly one borderWidth above the right point. This ensures we will draw over the BubbleView’s border and create a seamless line.